Home Assistant 2/6 — installing on a Raspberry Pi 4
· 4 min · Mateus Nascimento
Home Assistant series
- Overview
- Installing on a Raspberry Pi 4 ← you are here
- Home Assistant in Docker, with Portainer and HACS
- Devices, scenes and automations
- Dashboards with Mushroom, button-card and card-mod
- Cameras and secure remote access
In this post we'll see how to install Home Assistant on a Raspberry Pi 4, from choosing the hardware to setting up backups. In my view, the Pi is the simplest way to get started: it's small, silent, uses little power and can stay on 24/7.
1. Hardware
| Item | Recommendation | Why |
|---|---|---|
| Board | Raspberry Pi 4, 4 GB or more | 2 GB works, but gets tight with many integrations |
| Storage | USB 3 SSD (or a good brand A2 SD card) | The database writes all the time, and cheap SD cards tend to die early |
| Power supply | Official, 5 V / 3 A | A weak supply causes random freezes that are really hard to diagnose |
| Network | Ethernet cable | The house's hub deserves a stable connection |
| Case | With heatsink or fan | The Pi gets hot, and too much heat throttles performance |
Tip: if you use an SSD, plug it into a USB 3 port (the blue ones). Recent Pi 4 boards boot from USB out of the box.
2. Flashing Home Assistant OS
Home Assistant OS is the official image: a lean system with everything ready, including updates and add-ons.
- Install Raspberry Pi Imager on your computer.
- Under Choose Device, pick Raspberry Pi 4.
- Under Choose OS, go to Other specific-purpose OS → Home assistants and home automation → Home Assistant and pick the Pi 4 version.
- Under Choose Storage, select the SSD (or SD card).
- Click Next and wait for it to write and verify.
With that, just plug the SSD into the Pi, along with the network cable and the power supply.
3. First boot
The first boot takes a few minutes, because the system downloads the latest version. Then, in a browser on any computer on the same network:
http://homeassistant.local:8123If that address doesn't open, find the Pi's IP in your router's device list and go to
http://PI-IP:8123.
The onboarding asks for:
- Admin name and user (with a strong password)
- Location: used for weather, sunrise and sunset
- Time zone, units and currency
- Anonymous usage data (optional)
When you finish, Home Assistant starts finding devices on the network: TVs, Chromecasts, printers and Wi-Fi bulbs show up on their own under Settings → Devices & services.
4. Static IP
Automations, apps and remote access depend on Home Assistant's address, so if the IP changes, everything stops working. To avoid that, there are two options:
Option A (recommended): DHCP reservation on the router. In the router's admin panel, look for something like DHCP → Address reservation and bind the Pi's MAC address to a fixed IP.
Option B: from Home Assistant itself. Under Settings → System → Network, open the end0 interface, switch IPv4 to Static and fill in:
IP address:  192.168.0.50/24
Gateway:     192.168.0.1
DNS server:  192.168.0.1
These addresses are just an example. Use a range that exists on your network and is outside your router's DHCP range.
5. Backups (do this on day one)
Once it's set up, losing Home Assistant means redoing the whole configuration. That's why backups should be set up on day one, under Settings → System → Backups:
- Turn on automatic backups (daily is great)
- Choose how many to keep (I keep the last 7)
- Store the encryption key in a password manager: without it, the backup won't restore
- Set up a location off the Pi (a network share or the cloud), because if the SSD dies, the backup dies with it
6. Monitoring the machine
With the System Monitor integration (under Add integration → System Monitor), you can see the Pi's CPU, memory, disk and temperature right on the dashboard:
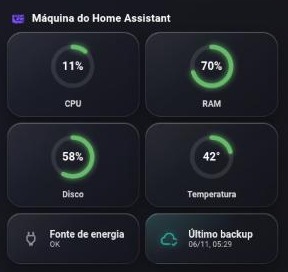
This helps identify problems before they affect the house, such as a disk filling up, high temperature or memory at the limit.
Checklist
- Home Assistant OS flashed to the SSD
- User with a strong password
- Static IP
- Automatic backups off the Pi
- Machine monitoring
In the next post we'll look at the other installation path: Home Assistant in Docker, along with Portainer and HACS.