Home Assistant 1/6 — why I turned my house into an engineering project
· 4 min · Mateus Nascimento
Home Assistant series
How it all started
I've always liked IoT. Seeing a sensor detect something and a device react on its own, without anyone pressing a button, has always caught my attention. So when I started adding smart bulbs, plugs and other devices at home, it was natural to want to go beyond what the apps offered.
The problem showed up quickly. Each vendor had its own app, and they didn't talk to each other. Setting up a simple scene meant opening several different apps, and once everything was configured, keeping it organized became a job of its own: a rule in one app, a schedule in another, a tweak I couldn't even remember where I'd made.
On top of that, most of these devices depended on the vendor's cloud. That meant that when the internet went down, the house simply stopped responding. And after a power outage, some devices came back in the wrong state or lost their configuration, and everything had to be set up again.
With that in mind, I started looking for a way to centralize everything, something that ran inside the house and didn't depend on the internet for the basics. That's how I got to Home Assistant, an open source home automation platform that brings devices from different vendors into a single place.
Why it's so much fun
What I like most about Home Assistant is that it turns the house into a project that never ends, in a good way. Every new device is an integration to understand, every household routine is an automation waiting to be written, and every problem (the sensor that doesn't respond, the automation that fires at the wrong time) is a bug to investigate.
For anyone who likes IoT, it's a complete playground: hardware, networking, servers, YAML, interface and even some UX, since in the end the person using the dashboard isn't only the person who built it. And the best part is seeing the result every day: the light that turns on when you walk by, the house adjusting itself at the end of the day, all working even without internet.
In this series I'll show how I built mine, following this flow: (1) overview and architecture, (2) installing on a Raspberry Pi 4, (3) installing with Docker, (4) creating scenes and automations, (5) building the dashboards and (6) integrating cameras with secure remote access.
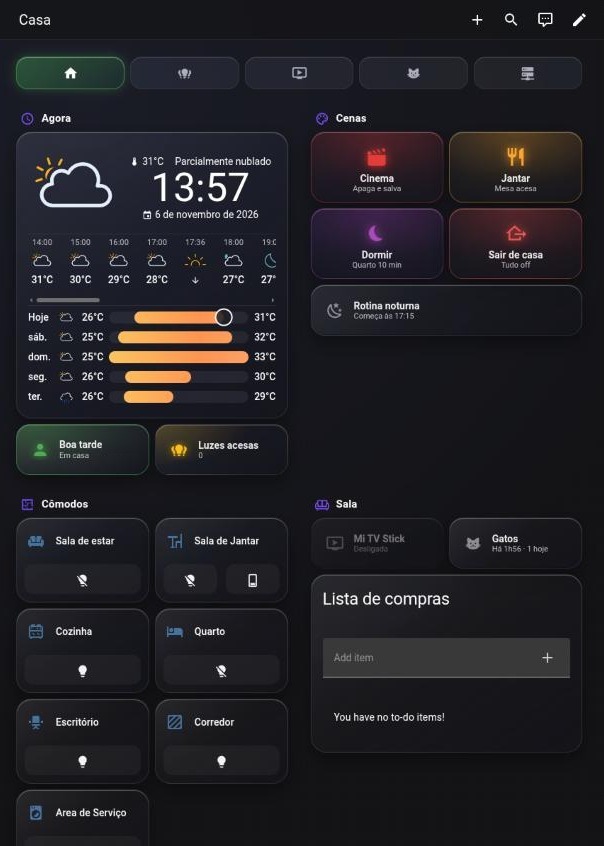
What it does today
- Control of lights and plugs per room, with scenes
- Automations based on sensors, time and presence
- TV and camera integration
- Dashboards organized by room
- Remote access with HTTPS and two-factor authentication
The architecture
In short, the architecture can be split into four layers:
┌──────────────────────────────────────────────┐
│  Interface: dashboards (web and app)          │
├──────────────────────────────────────────────┤
│  Logic: automations, scenes and scripts       │
├──────────────────────────────────────────────┤
│  Home Assistant (core)                        │
│  state of everything + integrations           │
├──────────────────────────────────────────────┤
│  Devices: bulbs, plugs, sensors,             │
│  TV, cameras                                  │
└──────────────────────────────────────────────┘
Home Assistant stores the state of each item in the house (light on, door closed, motion detected) as an entity. Automations react to changes in those states, while the dashboard is the way to view and change them. For anyone who builds apps, the pattern is familiar: an event-driven state holder.
Where it runs
There are two main installation paths, and the series covers both:
| Home Assistant OS | Home Assistant in Docker | |
|---|---|---|
| Where | Dedicated machine (e.g. Raspberry Pi 4) | Any Linux server with Docker |
| Install | Flash the image and boot | docker compose up -d |
| Add-ons | Yes, from the UI | No, each extra is its own container |
| Updates | One click | pull the new image |
| For whom | Wants simplicity | Already has a server and wants full control |
For those just starting, the Raspberry Pi with Home Assistant OS is the simplest option. For those who already have a home server running other services, Docker makes more sense, since everything can be managed the same way.
What the project involves
Beyond the automation itself, the project allowed me to practice different areas:
- Integrating systems that were never meant to talk to each other
- Fault tolerance: the Wi-Fi dropped, the bulb lost power, now what?
- UX: the interface has to be simple for non-technical people
- Infrastructure and security: containers, networking, certificates, firewall
In the next posts, each of these steps will be detailed with the configuration used.